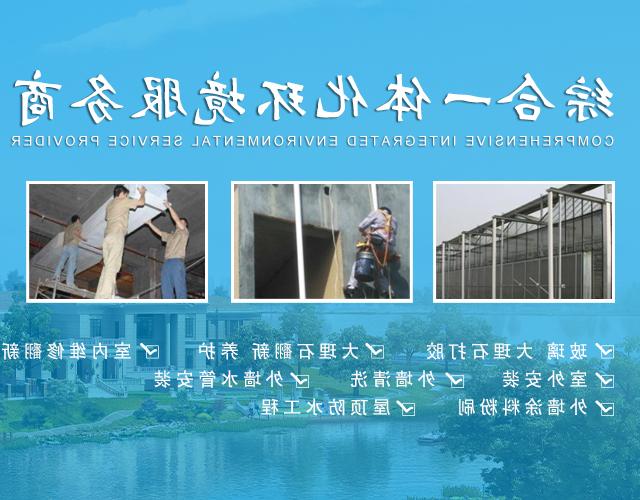
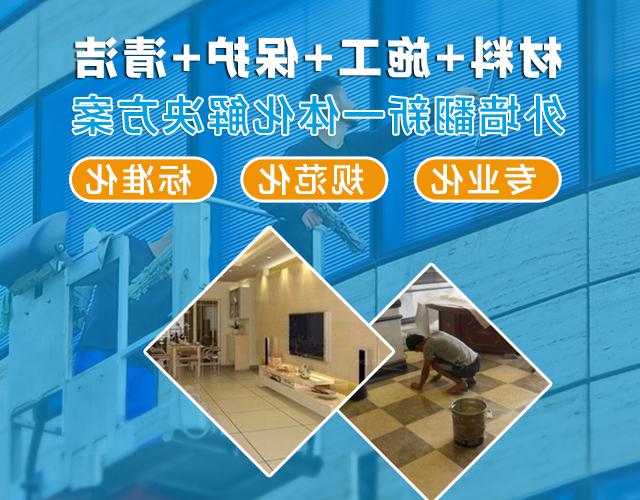
First Turns: Of Powder and Crust and Corn

First Turns: Of Powder and Crust and Corn

I’ve gotten a few days of skiing since the beginning of November, mostly
kicking and gliding through the woods. But I have had a couple of
telemarking adventures mixed in with my cross-country outings. I did miss
the 1st turns in October; I was out of the country in the Tropics. Darn!

Still, I returned to another storm. On the 2nd Sunday in November, there
was just enough snow near my home at 5,000 feet to climb up the hill a
block from the house. I stopped to admire the post-storm views then slid
back down to the road again. With only 6-10 inches of snow cover, I dodged rocks
and logs. Still, turns are turns – first turns of the season. Yea!

The Tuesday before Thanksgiving I headed out for a dawn patrol
before work. The snow was older by then and had received some rain. How
bad could it be?

dawn patrol

Skinning up at 7:30AM, the crust was slick but seemed firm enough to
support a sliding turn; no worries about getting back down (so I thought
as I climbed). At about 8,000 feet on a shady North Westerly aspect, I stumbled
upon 200 yards of untrammeled powder. Wow! First powder turns of
the season. Woo, hoo. After a couple of rounds up then down, it was
time to head down for work.

That firm crust? Not firm enough! As a turn would develop, one ski would
break through and come to a complete stop. My other ski and body of course kept moving. Sitzmark! I must have fallen at least 6-7 times. Not So Fun. “OK”, I
thought, “back to traipsing through the woods on whatever snow remains”. I admit it publicly, I do not know how to ski breaking crust. (I’ll take suggestions…)

This last Friday I checked the avalanche report for the weekend (“low”). Southerly aspects
receiving mid-day sun were predicted to warm up enough to form corn. Corn?
Early December? Really?

This is California, folks. If there’s snow that gets rained upon (or other slush
forming conditions), followed by a hard refreeze, when that firm crust sits in the
famed California Sun, we get corn snow. So, yeah, the conditions made
perfect, mid-day corn, just like late Spring, only later in the day with no sun cups.

Saturday around 11AM, I went in search of the fabled California corn. I
found 3 glades, one below the other, softening to about 1-2 inches. I had so much
fun that I planned my Sunday around a mid-day return. The
second day, my older lines had softened enough to ignore. (no ruts)

glade 2

Oh, and can I still turn my skis after the Summer break? (telemark turns
being what this blog is supposed to be about)

Well, every turn wasn’t picture perfect, I’ll admit.

I’m working on getting onto the ball of the back foot instead of balancing on the joint
between toes and foot. This shift is causing some front-to-back balance
issues.

Irrespective of how the lead and edge change is accomplished, the upper
body stance must remain balanced between the feet in order to keep weight
on the back foot. Lean forward to create an instant “doggie leg”. If it’s
not one thing it’s another. Once I remembered to angulate rather than lean, my turns became more consistent.

But, hey, a turn is a turn is a turn; it’s still early in the season, right? Last year’s lead change magic is still magic, especially on perfect corn on a blue bird day, 8,000 feet up
in the Central Sierras.

Life is good. Happy telemarks (or whatever your backcountry turn of
choice)

cheers

/brook

endofturn


What To Do During The Long Dry Summer?

What to do during the long, dry Summer?

Well, of course, there are all those wonderful Summer activities. Still, some of us just don’t know when to give up, yes? My last turns were taken June 23 on Hiram Peak. I picked my way down a 20 turn patch, twice, then walked down to catch 10 more on what remained on the steeper bit above Highland Lake. The end.

I’m sure I could have found more snow in California. I could have hiked all the way in to Leavitt Peak or up on Mt. Lassen. In August, I played the 4 & 20 Blackbird Festival in Weed, CA. As I passed Mt. Shasta, the leftover snow was calling, for sure. But I didn’t have skis with me, so, no turns.

Still, my Spring adventures did reward me with more information about the technical changes that I started working through at the Bear Valley Telemark Festival at the end of March. After the perfect corn snow starts to wither under the intensifying sun, sun cups  develop. It can be challenging to ski well developed sun cups.

sun cups

Well developed sun cups

Even if the snow is relatively soft, the skis bounce around on the edges of the cups. If the cups are big enough, my skis have even bounced from cup edge to edge. I have found it especially difficult to get from one turn to the next. My skis will bounce around, getting knocked so that each ski is going in a different direction. And these effects are most especially pronounced between turns, that delicate moment when the skis are light and being rolled from one edge to the next. Those dips in the snow will throw my skis around, willy nilly.

In the past, I’ve passed on skiing well cupped snow (as in the image, above). But not any more! Victory! Success! Free heel fun!

If you’ve been following my telemark turn lead change adventure, you’ll understand that dramatic changes have occurred in my telemark skiing since I started this blog. I’m chronicling my journey, here. Readers get my discoveries once I have come to understand them enough to explain.

I continued exploring my new lead change technique from mid-April through my last turns towards the end of June. I skied every weekend at least one day. During those runs, I ran into Spring snow conditions from frozen solid to mush, smooth to crumbly to (ugh!) well cupped. And here’s what I discovered.

An old trick becomes new again.

In modern skiing on shaped skis, telemark or parallel, all one need do to shift from one turn to the next is to roll the skis onto the new edge. This is ever more efficient than the old days with longer, straighter skis. In those days, it was “down-up-down”, with strong emphasis on the unweighting of the skis. Those straighter puppies would hook if you didn’t move them while they were really light.

Today, such gymnastics aren’t necessary so long as the snow is relatively consistent or well groomed. If a skier, expecially at speed, reaches down hill to start the turn and let’s his/her body follow, the skis will roll over to a new edge. The trick is to get into the angulated form (the ‘C’) as soon as the skis are on the new edge. Voilà, new turn starts, no big unweight required.

That said, there are conditions that benefit from unweighting and even turning the skis while light. Watch great skiers. The do come up between turns, at least a little bit.

And that’s what I added to defeat those sun cups baking into the California late Spring snow fields: a big unweight. My working theory is that the force of coming back down hard on my edge right at the start of the turn pushes into the snow with enough force such that the cups uneveness doesn’t have a chance to work the skis. And then, since I’m on edge right from the start of the turn (no sliding), I cut right through. It’s a theory. More importantly, it works.

telemark lead change

Sequence demonstrates starting turn with inner ski

  1.  I’m edging strongly to finish my turn. At the same time, I reach downhill with my pole to start the next.
  2. I allow the pole to bring my body up and off my skis while also projecting me a bit downhill towards my next turn. This is something I learned when I was a kid in alpine racing. You pass your pole and that automatically begins to raise the body off the skis.
  3. My skis are flat; I’m already starting to roll into the next turn. Note that my back ski from the last turn is still in back; While my stance has collapsed, I haven’t really begun to change lead skis. And also note how erect I am.
  4. The new turn is begun. You can see that I’ve edged the new inside ski quite a bit. I’m already starting to angulate into the new turn though I haven’t reached the fall line yet (the camera is directly downhill from me). Interestingly, my outside ski, still trailing, is still flat on the snow and going in a different direction. But since I have all my weight focused onto the inner ski, this “mistake” doesn’t actually cause any problems. That inside ski is already turning hard. The outside is just along for the ride at this moment.
  5. Both skis are now on edge and parallel. The outside ski has moved forward just a bit; it’s in motion. My body is angulated into the new turn. And, I’m finally in the fall line.
  6. You can see a plume from the inner ski. But there isn’t one from the outer (now, lead) ski. That’s because that outer ski still doesn’t have a lot of weight on it; it’s just beginning to come into play. Finally, I begin to get the magic of telemark: both skis working for me.
  7. And, I’m just about at the end of the turn. Both skis are turning, both are edged. I’m reaching out to start the next turn.

I’ll note that there’s one huge mistake in this sequence. I’m going to have to break my habit of skiing on my back foot’s toes. “On the ball of the back foot, the ball”. Next year! Watch this space.

Here’s the sequence of turns as I made them:

Lead Change on Sun Cups Turn Sequence

cheers,

/brook

Back Seat Pressure

“Sit on the back ski”.

Have you been told this or read it somewhere?

In my experience, this is good advice; yes that’s how it works. But, it’s a gross over-simplification.

To pressure the back ski correctly requires a few other things to be in place. And, to do this in isolation of other factors takes the skier out of the dynamic process that takes advantage of the physics of the turning ski.

The best description of the telemark turn process that I’ve heard so far is in Unparalleled Productions’ telemark instruction video, “Free Time”. Additionally, for those with a more analytical bent, some scientifc analysis has been done on the pressuring techniques of Telemark Demo Team skier, Jimmy Ludlow.

In “Free Time”, pressure is described as moving from front ski to back. It is a “smooth” process, not a sudden jerk, or slam. The timing of the process is dependent upon the type of turn that is intended: quick “check” turns, vs. short-radius, fall-line turns, vs. long radius carvers. Each of these has a different pressure rhythm and gradient to it.

The “Free Time” skiers describe the process as “moving pressure from front ski to back ski”. In fact, one of the points made in the video is that over pressuring the back ski, especially very early in the turn, will result in a side-slip instead of a carve. “Carve” here meaning a controlled arc. This is in line with the following statement:

“Generally, it is desirable to start the pure carving action early in the turn. This will be possible only when the skier can establish “early pressure” with the dominant ski(s)….The skilled skier will do this while maintaining sufficient ankle bend to provide enough tip pressure so as to lead the carving ski(s) into the turn.
~Adapted from the U.S. National Ski Team’s Technical Statement

I was riding a lift at Mount Rose on a cold, overcast, blustery, hard packed day. I chanced to sit next to a professional telemark racer who was also free skiing the mountain. We got to talking and he said something like, “you definitely have to drive with the front foot in this snow.”

Still, even in light of all this sage wisdom, I actually don’t think of the process as starting on my front ski.

I don’t know. Maybe that’s what’s scientifically happening? I don’t have the equipment that was put into Jimmy Ludow’s boots to allow me to analyze my precise patterns. Instead, I have to rely on my senses, on my somatic experience. And my senses don’t scream “front ski” at the start of my turn. I’m feeling for both skis, and specifically, “feeling for edges”.

What I experience is that both skis begin turning in response to the return of my weight after I’ved changed edges and lead ski (up shuffle).

In fact, I used to start my turn entirely with the front ski. The back ski is flopped down behind the front ski after the turn is well along. This manouveur does accomplish a quick change of direction. But I experience turning on the front ski as instability. When I observe other skiers using this technique, I see them slide with the skis across the fall line, an uncontrolled slide. Not at all what I want in my skiing.

So when should one apply pressure to that back ski?

One solution is the “peanut butter spread”. It can be very useful to begin to pressure both skis as they are moving away from each other; timing the pressuring to just after the feet have passed during the lead ski change. This is described in Allen & Mikes Really Cool Telemark Tips book as “spread peanut butter”. This isn’t carving. In fact, it’s a controlled slide that rapidly creates a direction change because the slide is happening to both skis at once. Though each ski is sliding in a different direction (one forward, one backwards), still, both skis are edged together, so they both turn in the same direction. The skis have to be on the “new” edge; that is, the new turn has already started before one can perform a “spread” garland like this.

In soft snow, as in skiing in powder, I find that this a great technique for getting the turn started. Performing a spread may even be sufficient when powder is deep or turn radius is short.

Useful as it may be, the “spread” is not a required part of the turn. It’s a handy technique to apply. I think spreading makes a strong turn beginning, adding an extra oomph to get the skis into the new direction. But it’s not the whole turn. I want to carve. And, I don’t use a spreading garland at all for my big radius, long carved turns.

Even more to the point, I have found using only a spreading motion is entirely insufficient on steeper slopes. There’s just too much sliding for me. I’m not strong enough to absorb that much gravity comfortably (though I’ve seen plenty of stronger skiers who can). I need a more controlled turn. This is even more critical for me when I’m in the trees, where any amount of uncontrolled slide might smack me into something I want to ski around. But then, I’m a very careful tree skier.

The control I seek can be gained through a process of putting more pressure on the back ski as the turn progresses. Let me explain what works for me.

There are two basic forms of the pressure gradient: quick, for short radius turns, and steady for long carvers.

First, I find that I cannot easily pressure my back ski unless my posture is quite erect. Posture is my key for my ability to deliver power to my back ski1.

Try standing in a telemark position off-snow. Experiement with where your hips are, front to back until you feel that your weight is evenly distributed between your legs. Move your hips forward and back to feel the weight shift, then come to center.

Now, let your back roll into a little bit of a forward curve, like a very mild slouch. Let your shoulders drop and roll forward a little. The small of your back will be more or less straight, even slightly rolled forward. Let your hips crack so that your chest is a little forward, perhaps above your forward knee. This is actually a fairly typical parallel skiing stance, “soft shoulder,  athletic stance” as I’ve heard it described. Doing this, I feel no dramatic shift in my weight distribution, if my hips are centered between my feet. My weight seems to be evenly distributed. I used to telemark like this, and it worked fine, except it was hard to get caving weight on my back ski when gravity forces were stronger.

Now, straighten your spine and shoulders into a very upright posture, as though standing to attention. Don’t change your legs. Do you feel it? Immediately, I can feel extra weight on my back foot. It’s like magic. The upright posture easily allows me to put extra pressure on the rear foot. From this position, I find it trivial and efficient to vary the amount of pressure on my rear foot from “light” to bearing down. I can make this variance without changing the relationship of my hips to my legs. I imagine that this is what “sit on the back foot” means.

Let me explain how I put my posture and weighting to use on skis.

After I’ve changed lead skis, I will start to feel my weight return to both skis. The skis will start to turn. I should have already started to angulate (making the ‘C’ with your body). I shift my attention to my back ski. At all times, I try to keep my posture more erect than I typically might when parallel skiing.

After I’ve shuffled to change lead skis, which involves having the skis light and unweighted, my weight comes back down onto the skis. I concentrate on being centered, front to back. As I feel the skis bite in and start to turn, as they begin to react to the pressure of my weight, I begin to gradually apply more weight to the back ski.

How much weight on the back ski and how quickly?

I believe that each movement on skis should always be a process. Understanding this takes somatic awareness. I’m not saying that it can’t be fast. The pressure can be applied quickly, just not all at once. I ease into it. I first practiced this slowly until I got the feel. Then I could speed it up for faster, fall-line turns.

If I’m going to carve a long turn, I keep the pressure steady at the carving arc that I want to follow until I’m ready to finish the turn. If it’s a short swing, then the back leg weighting gradually increases until the skis bite.

As I experience it, skis don’t bite from pressure alone. At the end of my turn, I’m also steering a tighter turn with my feet. I feel the pressure to the inside of the turn with my feet and ankles. And, of course, I’m edging more through increasing angulation. These 3 activities are happening at the same time, in concert with each other:

  1. back leg pressure
  2. tighter steering
  3. increased edging

The combination of these 3 processes together causes the skis to turn more extremely, which causes a noticiable bite, grip, a slow down of the skis. This bite is the end of the turn, or more precisely, the finish of the turn. This is the “check” that slows my speed and gives me control, even on the steepest slope.

If I want a very fast check turn, then I perform this pressured, steered edge as soon as I feel my new edges in the snow 2. Again, I try not to slam my skis. I let the ski check itself in response to steered, edged pressure.

When I feel the skis bite into the snow, that’s the end of the turn. The skis seem to grip the snow as though of their own volition. It’s a function I believe of effective edging, pressuring, and steering, as I’ve tried to explain, above. Control does not result from slamming down onto the ski. That causes a slide, not the tight finish for which I’m looking. And, of course, the finishing “check” is the beginning of the next turn, as I reach out and down to plant my pole. Which naturally and organically causes me to release my edges in preparation for the next turn.

cheers

/brook

Footnotes

  1. I discovered this posture trick quite accidentally after taking a parallel powder lesson (free heel, but parallel turns) with Kami at Mountain Adventure Seminars (MAS). Kami stressed maintaining an upright posture in the powder. She called it, “engaging the small of your back”. 2 months later, I was in some very dense Spring powder in Colorado. Having some trouble, I remembered the upright stance. Suddenly I was able to power through not only the untracked powder, but through the mashed potatoes left behind by the other skiers. I had a serious “aha!” moment where the relationship between posture and my back ski clicked.
  2. I probably won’t hit the check as hard as I might at the end of a fast, long radius turn, or as I might in a series of fall-line, short radius turns on a steep pitch.